Thursday 30 July 2015

.NET WCF: CONFIGURING WCF SERVICE WITH NETTCPBINDING

Apart from other bindings supported by WCF, I found netTcpBinding as more complex to configure than its other peers and less (rather scattered) information about the same over internet. I thought of putting it all together from the very first step at one place in order to make it easier for everyone including myself to use it as reference in future. So lets get started.
Remember : netTcpBinding hosting on IIS is only supported by IIS7 and later versions. I’m using Microsoft Visual Studio 2010 and IIS7.5 for this demo.
Step 1:
By default, IIS only supports HTTP or HTTPS. In order to let IIS support netTcpBinding, we first need to enable/activate WCF non-HTTP activation. To do that, Go to control panel > Program and Features > Turn Windows features on or off and then look for ‘Microsoft .NET Framework 3.5.1′ . You will see something like below:
Make sure you select both options. This will enable IIS to support HTTP, HTTPS, net.tcpnet.pipe,net.msmq, msmq.formatname.
Remember : After windows finish enabling these features, it will unregisters ASP.NET from the machine.
Step 2:
As this has unregisters the ASP.NET from the machine. So, next step is to register ASP.NET with IIS. To do this,go to Visual Studio Command Prompt and then type ‘aspnet_regiis -i’. This will register the ASP.NET with the IIS and you will be able to host your web application again.
Step 3:
Now next step is to check if you have required windows service running. Go to Administrative tools > Services and check the following service if they running, if not start them.
These three service ensures that IIS is able to listen to TCP request and also enable the port sharing.
Step 4:
As you machine is now configured to support netTcp, next step is to configure IIS to enable a website to use net.tcp port which is 808 by default. You can also change it any other port you want. Make sure you don’t configure net.tcp to port 80 because it is being used by HTTP and you cannot have two protocols running on the same port. Alternative, either change HTTP port to something else other than 80 (only if you want to use net.tcp on port 80, BUT it is not a recommended approach).
Now time to configure IIS. Open IIS and then go to your WebSite (‘Default Web Site’) and right click on it and then go to ‘Edit Bindings’. You will see the following:
Did you notice that you got whole list of protocols other than HTTP and HTTPS. This is because we have enable WCF non-HTTP activation in step 1.
Now select net.tcp from the drop down and you will have something like following:
In the ‘Binding information’ text box, you need to specify which port you want to use for netTCP connection. As I mentioned earlier, 808 is default but you can have any other port as well. Format is ‘port:ipaddress’ so I entered ‘808:*’ and then click ok.
Now you website is configured to listen TCP connection request on port 808. Remember if you have multiple website where you need to setup TCP then you have to do the same for all the websites.
Step 5:
Next step is to enable net.tcp protocol for your application in the IIS. To do that right click on your application in the IIS and then click on ‘Advanced Settings’ and look for property ‘Enabled Protocols’ and there enter ‘net.tcp’. List of enabled protocol is a comma-separated list so you can enable multiple protocols by separating them with a comma.
Now your website is fully configured to use netTcp binding. Next step is to configure your project to have WCF service on TCP port 808.
Step 6:
Open Visual Studio Project where you have your WCF service and then right click on the project and then go to project ‘Properties’. You should have something like below. Select ‘Web’ tab from left and change servers to be local IIS web server instead of Visual Studio Development Server and change Project URL and point it to your IIS application.
The reason we have changed Server to be Local IIS Web Server instead of Visual Studio Development Server is that you can configure IIS Web Server to support net.tcp but you cannot configure the same for Visual Studio Development Server. This is because, Visual Studio Development Server only supports HTTP.
Now the next step is to configure your web.config of the project to support netTcpBinding for the WCF Service.
Step 7:
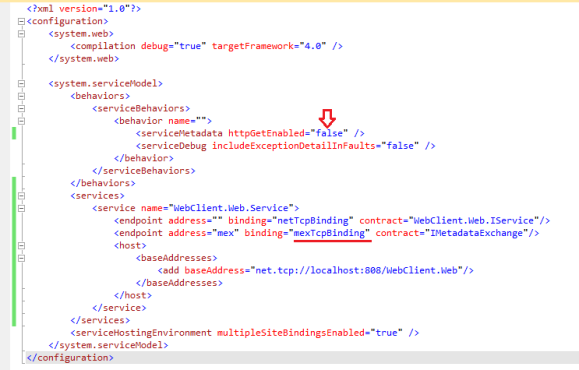
Our last step is to configure web.config to use netTcpBinding for the WCF Service. Following the sample of web.config on how it should for a WCF service using netTcpBinding.
Now there are few points to note:
– ‘httpGetEnabled’ attribute of ‘serviceMetadata’ must be set to ‘false’. This will allow to discover WCF service metadata over non-HTTP protocol.
– Note we are using ‘mexTcpBinding’ for the mex endpoint. You can also use ‘mexHttpBinding’ but then you have to set ‘httpGetEnabled’ attribute to ‘True’ and you should be able to locate your WCF Service using http address instead of net.tcp.
–  Its important that you specify the baseAddress for your endpoint. This will help IIS to let find your WCF Service. It will then know where to look for.
Step 8:
Next and final step is try and find your WCF Service in the browser.
Please note: you will only be able to discover service metadata in browser if you have set httpGetEnabled to True and have used mexHttpBinding instead of mexTcpBinding in the web.config. This is because, web browser only supports HTTP and HTTPs. Oterwise it will only be discoverable from within visual studio itself (see screenshot one after the below).
And now try using Add Service Reference option where you want to add the reference to this WCF Service.
Thats it and your ready to go.
Following are the errors you can encounter if you skipped or didn’t do any step properly.
Issue 1:
Resolution:
– Check if you have correctly enabled the protocols for the application in the IIS (Step 5).
– Check if you have mentioned proper baseAddress in the web.config (Step 7).
Issue 2:

Thursday 9 July 2015

Magento: Add Magento Admin User Using MySQL Script

This script quickly adds a Magento Admin user directly into the database. It is possible to run this script from the command line or by copying and pasting into phpMyAdmin. Just make sure to edit the following fields with your personalized data and import. Most of these fields are trivial, I’m just listing them so you don’t miss anything.
  1. Set the salt portion of your password. You’ll rarely need to change this. If you do, just use two lower case letters of your choice.
  2. Set your password. At least 8 characters in length and at least one digit.
  3. Firstname: Enter admin’s first name.
  4. Lastname: Enter admin’s last name.
  5. Enter email of admin user.
  6. Enter username where ‘myuser’ is set. Notice ‘myuser’ shows up in two places.
  7. Enter Firstname again. This is more symbolic to label the rule.
LOCK TABLES `admin_role` WRITE , `admin_user` WRITE;

SET @SALT = "rp";
SET @PASS = CONCAT(MD5(CONCAT( @SALT , "password") ), CONCAT(":", @SALT ));
SELECT @EXTRA := MAX(extra) FROM admin_user WHERE extra IS NOT NULL;

INSERT INTO `admin_user` (firstname, lastname, email, username, password, created, lognum, reload_acl_flag, is_active, extra,rp_token_created_at)
VALUES ('Firstname', 'Lastname', 'email@example.com', 'myuser', @PASS, NOW(), 0, 0, 1, @EXTRA, NOW());

INSERT INTO `admin_role` (parent_id, tree_level, sort_order, role_type, user_id, role_name)
VALUES (1, 2, 0, 'U',(SELECT user_id FROM admin_user WHERE username = 'myuser'), 'Firstname');

UNLOCK TABLES;

Log in to Admin Panel

    • Access denied.
I created the user using http://localhost/index.php/admin/ magento admin panel, but did not assign the user role that is why the it showing this error message.

Magento: Configure a virtual directory using WAMP outside of WWW

Configure a virtual directory using WAMP

sanjayanuwanPHPMay 13, 2009
As a web developer many want to test their developments on their local machines. But when it comes to dealing with PHP and MySQL you will need a web server (software) to test the sites you make. Normally we would have to download Apache from www.apache.org , MySQL from MySQL.net and configure these separately to work with each other on our local machine. Also if you want to administer MySQL on the browser you will have to install PHPMyAdmin which is a burden for the novice user.
To tackle these problems there are several packaged solutions on the net. Popular and more robust one is WAMP server. www.wampserver.com .
Let see step by step on how to create a root folder for our new web site that has to be built using PHP.

Step 1: Easiest way!

After installing WAMP on your local machine (You should see a white Speedo meter on the notification area) goes the folder where WAMP resides (If you install it on you C: partition then it is C:/wamp/). The folder structure is as follows,
image 1
Go inside the www folder and create a new folder inside it called "TestSite". This is the rot folder of your web site. Better if you do not put spaces. Open up a simple notepad document and insert the following on it (don't copy the formatting. Just type it),
<?php echo "Hello World!"; ?>
Then same it inside the newly created folder and name it index.php.
Go to your browser and call http://localhost/TestSite/
If you see something like this then you are ready to do building rest of your dynamic web site.
image 2

Step2: Assigning a root folder outside "www".

Well, if we want separate our web site folders from the WAMP server folder and put somewhere else in the hard drive then procedure gets a bit tricky for the beginners.
First create the folder you want as the web site root folder. Let's say D:/MyNewTest/
Now we have to tell the WAMP server that this folder contains a web site and it should come up when the URL is called through the browser right?
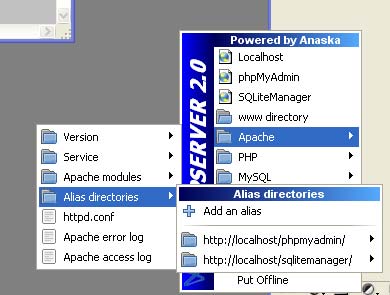
Ok, first click on the little Speedometer icon on the notification area. Then go to,
Apache > Alias directories > Add an alias
image 3
Then you will be asked to give an alias to the site, this is what you type after http://localhost/ in the browser. Previous one was "TestSite" which is actually the folder name itself. But this is not necessary in this case. You can put anything. But don't use spaces or dots. J
image 4
Let's put "MySite".
image 5
Then you will be asked what is the actual folder that MySite alias point to.
image 6
Give the following, D:/MyNewTest/
Note the forward slashes.
Configure a virtual directory using WAMP
Now press enter to close the DOS prompt.
Go to your browser and type the http://localhost/MySite/
You will see the root index now. Put the notepad file we created earlier to "D:/MyNewTest"and refresh the browser page to test the PHP.
That is it. Simple isn't it?


Read more: http://www.webdesign.org/web-programming/php/configure-a-virtual-directory-using-wamp.16605.html#ixzz3fPACZBLa

Shelter: Magento admin url redirecting to Wampserver page

I wanted to login to magento server admin panel using url: http://localhost/index.php/admin/ and it was bringing the wampserver page.

Solution
It look's like you have not set the good parameter for base_url. Go on your database -> 'core_config_data' -> 'base_url' -> 'value'
 
In 'path' row search web/unsecure/base_url and web/secure/base_url, then look the row 'value' for those path –  zaka47 Sep 15 '14 at 15:39

Magento/shop/index.php/admin login page was redirecting to login page again:
In the base_url use the server name rather than localhost. This is well known problem in Magento.
Resolved it. Had to change in the core_config_data table,
Path:                      value:
web/secure/base_url       http://servername.com/
web/unsecure/base_url     http://servername.com/
in database.


Login Redirect Issue with Magento on wampserver or localhost

NEED TO EDIT Many of us would have face the problem of login issue in magento localhost. Let me tell you how to avoid this.
Problem: After installing magento in localhost if you try to enter admin panel after logging in you will get the same login page again without  any reasons(messages).
Solution: When logging into magento admin panel it tries to validate the url whether it is a valid domain or not and if it is not a valid domain, it will erase cookies and come back to admin login page again. Obviously our url will be http://localhost/magento and it is not a valid domain. To overcome this we need to change certain code in a file called varien.php which is located in magento core folder.
Now Let’s see how to make it work by modifying the varien.php
Step 1: Copy varien.php file from app\code\core\Mage\Core\Model\Session\Abstract folder
Step2: Paste into app\code\local\Mage\Core\Model\Session\Abstract folder. Before you paste the file you need to create the folders as specified in this path such as \Mage\Core\Model\Session\Abstract.
Step3: Open varien.php in your favorite editor.
Step4: Find line no 96 and the code will be like

if (isset($cookieParams['domain'])) {
$cookieParams['domain'] = $cookie->getDomain();

}
and replace with
if ((isset($cookieParams['domain'])) && !in_array("127.0.0.1", self::getValidatorData())) {
$cookieParams['domain'] = $cookie->getDomain();
}
Step5: That’s it. Now you will be able to login Magento admin panel.

How to enable mod_rewrite
To enable the mod_rewrite using the wampmanager menu system:

left click the wampmanager icon ( thats the W icon that sits in the system tray, usually bottom right of your screen )

wampmanager -> Apache -> Apache modules -> and click the line [rewrite_module] if it is not ticked
You may have to scroll the menu down to find rewrite_module


Alternatively you can manually edit the httpd.conf file

left click wampmanager -> Apache -> httpd.conf

This will open that file in notepad and you can locate the line
#LoadModule rewrite_module modules/mod_rewrite.so
and remove the comment symbol '#' to activate the module. Then save the file and restart Apache to activate this change.